I had a bit of a learning curve when learning how to use Heimdall to flash images onto my phone (i9506, aka ks01lte) so hopefully this can help others with what I learned.
First of all, Heimdall is a flashing software for putting firmware into the different partitions of Samsung Android phones. It’s cross platform, and supposedly equivalent in functionality to that of Odin, although I’ve never tried Odin. Heimdall is also cross platform so you can follow this guide if you’re on mac or windows I think.
Heimdall basics
There are two executable programs:
1. heimdall
2. heimdall-frontend
I recommend using heimdall-frontend, but you need both because heimdall-frontend depends on heimdall.
Heimdall version
At the time of this post, the newest version was 1.4.2. I had to compile that myself from source though, but it was relatively easy if you just follow the build instructions inside the readme. I had to use 1.4.2 to get it to work with my phone so if you have issues you should try getting the newest one. There were binaries of 1.4.0 on the official website, and 1.4.1 in the ubuntu repo.
Installing Heimdall
At the time, I could also install heimdall from ubuntu repos with apt-get install, however the packages were called heimdall-flash and heimdall-flash-frontend. Idk why, but they’re the same. Also they were 1.4.1 so they unfortunately didn’t work for me, so I had to install them myself after compiling.
So briefly how to install it, although I’m not gonna give the whole command specific walk through as it is in the readme:
It’s located at the github page:
https://github.com/Benjamin-Dobell/Heimdall
clone the directory:
git clone https://github.com/Benjamin-Dobell/Heimdall.git
Enter the directory and follow the build instructions as detailed (the last time I checked) at the very bottom of the readme file, specific for Linux, so it was inside the Linux folder.
Update March 6, 2019 – regarding the 1.4.2 source code
Since the time of writing, the project has moved, so the referenced github repo is now rather empty. You could follow his link to the new project, but if you’d like to try with the version that I used here, I made a fork which you can access here to clone and build for 1.4.2. (Both the master and 1.4.2 branch are the same, so you can use either one for the same result, I just made the 1.4.2 branch for emphasis.)
https://github.com/simernes/Heimdall/tree/1.4.2
Scroll to the very bottom of the README and follow the very simple steps to compile heimdall and heimdall-frontend:
https://github.com/simernes/Heimdall/blob/1.4.2/Linux/README
Now after building you’ll have two executable files:
heimdall
heimdall-frontend
The problem now is that you need to run these as root to connect to your phone, and heimdall-frontend uses heimdall, so you need to add them to your PATH.
However, by running sudo the PATH gets reset, so if you just export PATH=$PATH:$HOME/heimdalldirectory its not gonna find it so what I did (which you shouldn’t really do because it should be reserved for system applications but whatever, it works, and you can just delete the heimdall files after you finished to keep a clean system) was to put both files in /bin/
sudo mv ./heimdall /bin/
sudo mv ./heimdall-frontend /bin/
Now you can sudo heimdall-frontend
Other problems with heimdall
If you get libusb errors when trying to export pid or anything else, try a different USB cable, and try different ports on your computer. That actually worked for me.
Flashing of firmware
First of all, your phone needs to be in Download mode, so google how you do that. For me I had to power off the phone, and then hold Power+Vol Up+Home. Or Vol Down I can’t remember.
Then sudo heimdall-frontend and go to Utilities, and try to detect device. It should show a little messages saying it was detected.
Download and save .pit file
Next you’ll want to Download the pit file from your device. This is also a good way to check if heimdall is working correctly, by just trying to print the pit. But you should really download the pit file and store it because you’ll need it for flashing. It works as a sort of partition map (Partition Information Table).
So go ahead and download that and save it.
Now that you have that, you’ve done a very good job so pat yourself on the back. You’re a really advanced hacker person aren’t you? Wow. Good job. Now the real shit begins though so get ready. This is where you might brick your device so beware.
Really. Be careful. If you flash the wrong thing you’re fucked so. Yeah.
Also, the warranty of your phone will be void after you flash anything onto it like this, so this is a kind of point of no return, although you might be able to flash it back to warranty condition if you have the stock recovery img. Not sure if phones can recognize that or not.
Flash custom recovery first
The first thing you might want to do is install a custom recovery like TWRP. TWRP lets you backup all your partitions, which can be nice in case you flash the wrong thing and want to get back to square one. You can also save your partitions with dd but I’m not gonna get into that here.
Like I said, this might void your warranty, and after doing this, I could not update through the stock phone update mechanism anymore (I mean, as a regular person going into Settings->about->Check for updates on your phone, it said something like “Your phone has been changed, no updates for you”.
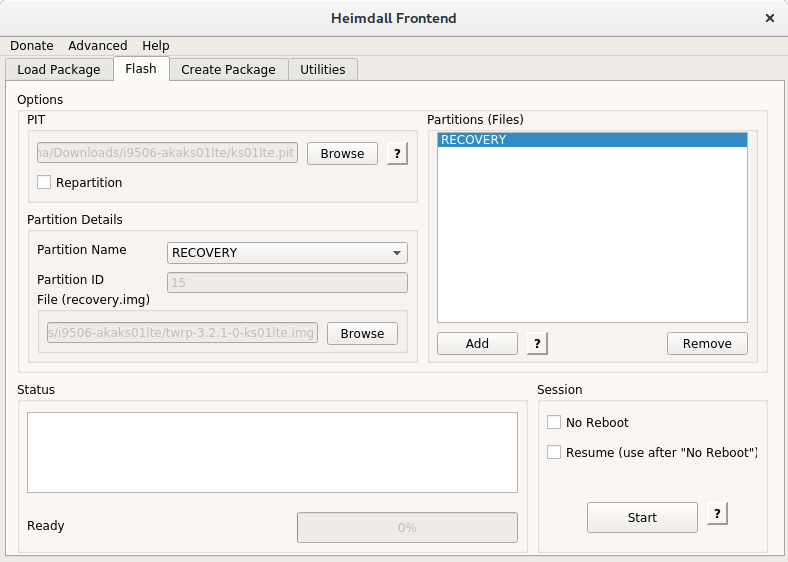
So to flash TWRP, open up heimdall-frontend again, go to the Flash tab, browse for your .pit file. Then Add a partition file, and select RECOVERY as the name, and find your recovery.img file: See figure 1.
Now, start, and it will reboot when it finishes probably so be ready, and make it reboot straight into recovery right away. If not the custom recovery will be wiped. For me, booting into recovery was the same as to boot into download, just the opposite direction volume.
Now go into BACKUP and backup everything, and store that somewhere on your computer. In case something goes wrong. TWRP backs up to a directory on your phone located in /TWRP/Backups/…..
Flashing the rest of the firmware
Next, we’ll be flashing some more interesting things. Like the full firmware, with modem and everything.
In my case I wanted to flash the newest stock rom update, because I needed the updated bootloader and modem firmware to install LineageOS 15.1 (Android 8.1), which I could later simply install from within TWRP.
So I downloaded the newest stock rom update from sammobile.
You can get the newest firmware from there for free if you sign up, but have to pay for older ones it seemed.
It might also be important that you get the right ROM for the right region or country, I don’t know if that affects the ability for the phone to boot or not, but I’d try to get the right one if I were you.
For me it was a large file of about 1.5 GB. A .zip file to be exact, which upon extraction revealed two files, one of them being a .tar.md5 file.
If I just renamed the .tar.md5 file to a .tar file (removing the .md5 part of the name) I could extract it, and it revealed the files that can be flashed by heimdall.
In my case the files were:
aboot.mbn
boot.img
cache.img.ext4
hidden.img.ext4
modem.bin
NON-HLOS.bin
recovery.img
rpm.bin
sbl1.mbn
sdi.mbn
system.img.ext4
tz.mbn
Which made me very anxious and insecure, and I felt that this was perhaps a bit much, but then I figured it out.
Just like that recovery file from before, all these files correspond to a Partition name in Heimdall Frontend, from the .pit file. So what we’ll actually do here with heimdall is just put the contents of these files/images into the partitions of our devices, and then they’ll replace whatever was there from before. So it’s all quite simple really if you think about it.
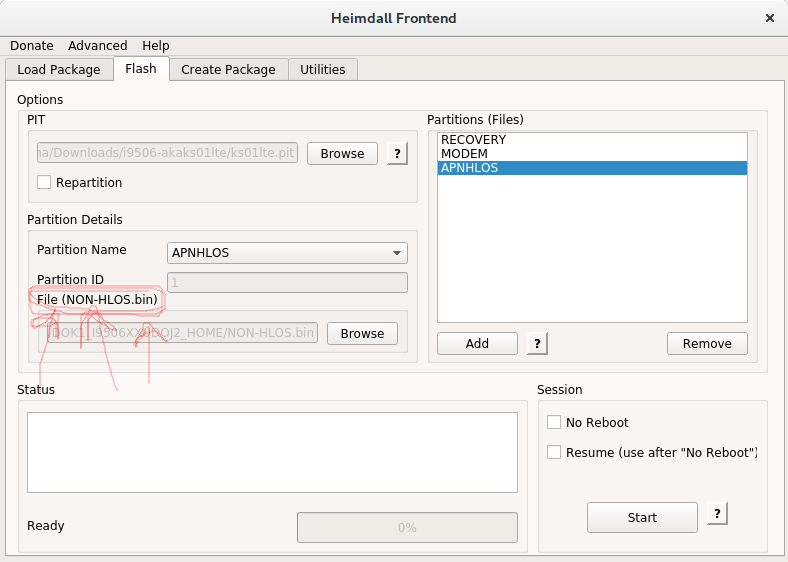
The name of the partition isn’t always the same as the file, but there is a file name hint below the name so look at that. For example the APNHLOS partition name corresponds to NON-HLOS.bin. See figure 2.
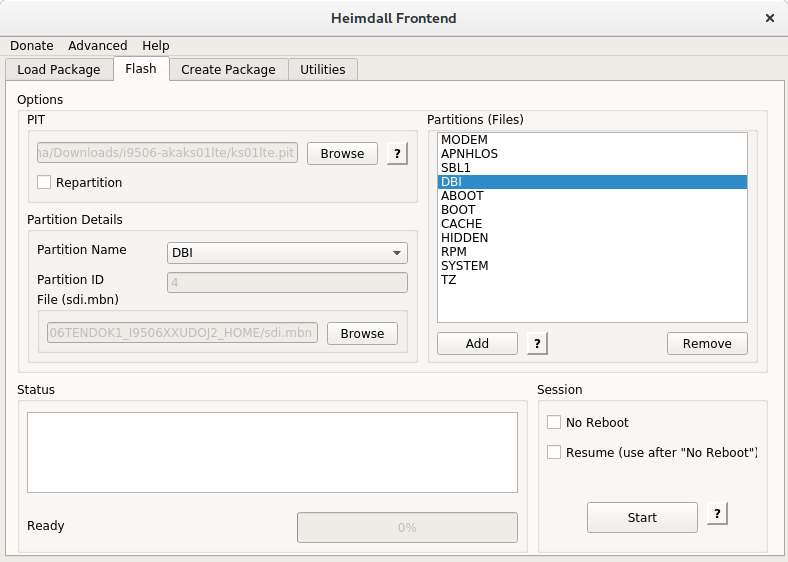
Now just keep adding all these until they’re all in heimdall (figure 3). This should be a pointer also to whether or not you’re using the right firmware. All files should fit into a partition. However, you might want to not flash the RECOVERY to preserve the custom recovery previously installed. You might have to boot directly into recovery again after flashing this time too to avoid reseting to the stock recovery, but I’m not sure. Just in case.
Now, if you dare, hit the Start button, and wait in excitement. Remember that your phone should be in Download mode right now. Also be sure to boot into recovery right away! And then just reboot, but your recovery might ask you if you want to remove the “Read only” permissioning, which I think you should do.
Great! That’s it! Hopefully you didn’t brick your phone. If you did, then hopefully you backed up with TWRP like I said before, and then you can restore it in TWRP. I think though that’s just if you “soft bricked” and not “hard bricked”, which is worse probably.
Good riddance! Thanks for reading. I hope it helped.
I have a Samsung Galaxy Fit (GT-S5670) which I’m trying to upgrade to the latest version (android 2.3). I was doing well until I got to the bit about the PIT file. After a huge amount of Googling I managed to find an archive which, supposedly, contained PIT files for all the Samsung phones. Among the thousands of directories I found one with the correct model number but all it contained was a .ops file. Finally, after more Googling, I found instructions for extracting it. I rooted the phone and opened a terminal window. I did the following:
adb -d shell
# dd if=/dev/block/mmcblk0 of=/sdcard/out.pit bs=8 count=580 skip=2176
580+0 records in
580+0 records out
4640 bytes transferred in 0.029 secs (160000 bytes/sec)
#
This successfully produced a file with a .pit extension but neither Heimdall nor PIT Magic recognised it as a valid file.
Any suggestions?
There are several things you did wrong but the first one is you get the pit file from the Download PIT in the utilities tab of heimdall so do that step first then follow the rest of the directions
It produced a *.pit file because you told dd to output a .pit file. In Linux file extensions are meaningless. There’s also no need to rename *.tar.md5 to extract it, as author suggests. A simple `tar -xvf file.tar.md5` would suffice. Also, there is no need to run heimdall as root if your udev rules are set up correctly, and your user added to the “usb” group – see https://gitlab.com/BenjaminDobell/Heimdall/-/tree/master/heimdall.
Hello, I use Heimdall with my Galaxy Note 8 and it works perfectly, my question is, can I perform an update of the stock ROM, with the twrp recovery installed and with magisk installed in boot ramdisk without losing my applications and data? Thank you
Great method, thanks! Working for me on a Samsung S4-A (i9506).
Worked a treat, thank you!
Hi. What partition does the file “tz.mdn” belongs to? I could not figure it out.
Tx!